Backyard Tank
Design
The size of the tank was limited to the space I had to place. All I could fit in the gap was a tank with a cross section of 800mm x 300mm. I did have plenty of head room for the tank though, so instead of a stock 1.8m tank, I went up to 2.4m. This is just enough room to route the plumbing from the down pipes into the tank.
This is what the tank will look like. The picture shows the tank, lid and inlet filter. The lip at the top of the tank is there to hold the lid in place and provide some additional stiffening at the top.

My fibreglass source of information was "The Glassfibre Handbook" by R. H. Warring. From that I decided to build a cardboard male mold and build up the fibreglass around it.
The mold was built up using stiff corrugated cardboard to make the frame and then skinned with a stiff cardboard sheet.

Construction
The pictures below show the frame and completed mold, skinned with stiff cardboard. The frame was made out of an old treadmill box; 6mm double ply corrugated cardboard. The cardboard skin was sticky taped and hot melt glued to the frame. This was quite difficult to do because there was a lot to glue, and the hot melt glue set too quickly. It was also hard to bend the cardboard around the frame smoothly.


The photo below shows the mold ready to be covered. What you can't see is the layer of cellophane completely encasing the mold. My original plan was to use cellophane as the mold release, as described in "The Glassfibre Handbook". However, when I went purchase my fibreglass supplies from Fibre Glass International, they recommended sealing the cardboard with a shellac, then using PVA mold release. I decided to use the cellophane because I could stretch it out and smooth out some of the surface irregularities. The matting is 600gsm CSM. I'm using a polyester resin. Total cost was about $200 for 20m of mat and 20 litres of resin.

The CSM (chopped strand mat) fibreglass was cut into 3 pieces to cover one face, and wrap around the sides and bottom. When the first face had set, the other face was covered. This gave one stiff layer to build on. The picture below shows the first layer of fibreglass. Notice the bubbling on the surface. There was a problem with the cellophane reacting with the resin, causing it to bubble up. I'm not sure why this happened. Possibly the cellophane wasn't really cellophane. Or maybe I should have used a gel coat between the cellophane and the first layer of resin/glass.

When the tank is installed, it will be strapped to the wall. This gives one side of the tank support against wall, but the other side needs stiffening to stop it from bulging out. After the first layer, I added some cardboard tubes, folded in a triangular shape, for stiffening. The cardboard itself doesn't stiffen the tank, its the next couple of layers of matting that do. Ideally they should have been installed like the drawing below. Unfortunately it was a bit tricky trying to lay the stiffeners flat on the bubbled surface.

The tank outlet and overflow ports where added before the final two layers. I used small pieces of aluminium plate, about 20cm by 20cm, with holes for the fittings. I used automotive polyester filler to help stick the plates to the first layer; the filler was needed to fill in the undulations in the surface. The fittings are shown below. You can still the rectangular outlines of the mounting plates under the matting.


The completed tank is shown below.

I left the tank to set for about 48 hours. While it was setting, I made the lid and the filter. The pictures below show the molds for the top and filter.


The red colour on the lid is a different type of cellophane. I was hoping that was the cause of the bubbling. The results were better, but there was still bubbling.
The filter is a truncated cone pot with a piece of aluminium flyscreen molded into it. You can see it in the picture above. The greyish colour covering the middle of flyscreen is candle wax. I used it to keep the resin off the middle part where the water will flow. Once completed, the wax was melted away, and any resin that found its way on top of the wax was just cracked off.
The picture below shows the lid with one layer of matting. The black line running around the side of the lid is the cut line. The lid mold was made extra tall so there was room for the fibreglass matting to over run the line. This was trimmed with a jigsaw using a metal cutting blade.

After a couple of days of waiting for the tank to set, it was time to remove the mold. A jigsaw was first used to cut the top of the tank to give a clean edge. Then the inner frame was removed. That part was pretty easy; just punching the cross members of the frame knocked them loose. Even the outer skin came loose easily; although the cellophane bubbled, it didn't stick. It was easy for the first meter; unfortunately the tank is 2.4m long. It took about 2 hours of prodding the frame with steel bars, and sliding a thin wooden stick between the fibreglass and the cellophane to finally get it all out.
The picture below shows the tank regurgitating the mold. And, yes, it was always planned that the mold would only be used once.

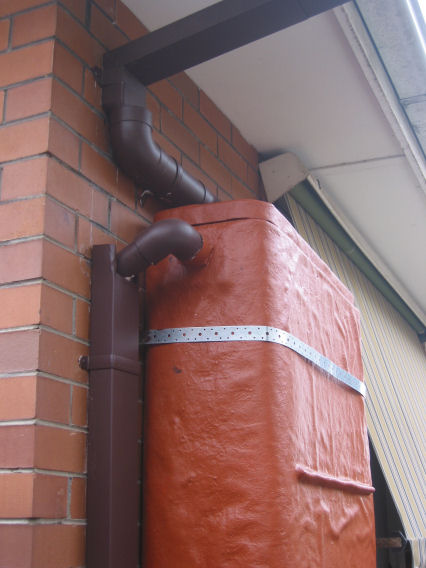
The tank was painted with a fibreglass friendly primer, then a stock exterior acrylic, Mexican Sunset (I think). The rain water pipes were redirected to the tank, and the overflow back down the storm water drain. The picture below shows the tank with a metal band strapping it to the wall. It needs to be painted too. You can also see one of the stiffeners towards the bottom of the picture.
Testing
A few days after the tank was installed, we got a good summer downpour. This was enough to fill the tank about 1/2 full. Unfortunately, it also showed some leaks in the tank.
When placing the two layers of mat over the stiffeners, it was very difficult to get it to stay flat. There appeared to be small pinhole leaks between layer 1, and the stiffeners, which then seeped out of the ends of the stiffeners, where the mat could not be folded down properly.
To solve this, I used a latex based water proofing paint. Because it was being applied to fibreglass, I also needed a special epoxy primer. All up, an additional $200. :(
The photo shows the tank returned to the garage, and painted with the waterproofing paint. A nice shade of swimming pool blue. This had to be done with a roller and a very long pole to reach the 2.4m depth.

Completed
The photo below shows the complete tank. There is a stripe of exposed fibreglass that was meant to be a visual tank depth indicator. This wasn't very effective, but once the inside was painted with the waterproof paint it was useless.

Next time
Things to do differently...
- Firstly, experiment a bit more with the resin. Try different resin/catalyst combinations and measure the working time. I once got stuck with about 1 litre of mixed resin that set because I put too much catalyst in. 1-2% is about right.
- Wear better protection - those disposable full body coveralls. The resin sticks to everything. The fibreglass is like little needs and get stuck every where. Don't wear good shows. It is very hard to get the resin and fibreglass off them.
- Plan corners. Cut the fibreglass to shape better.
- Try PVA as a mold release. Cellophane didn't seem to work.
- Or, maybe try a gel coat.