Microcontrollers (μC)
The first microcontrollers I ever came across were the OOPics and Basic Stamp at the local electronics stores. They looked interesting, but I thought they were too limited and too expensive - what can you do in 2k of memory? I'm not sure what sparked my intereset later; a book, a magazine, or maybe just trawling the 'net, but after a bit of experience with them, I've decided these things are the coolest electronics devices out there!
Which Microcontroller Family?
My choice of microcontroller was limited to what was available at the local electronics shops - Jaycar and Dick Smith - either the PIC or AVRs.
The PIC family seem to be the most popular, so I thought that was a good place to start. I purchased Programming and Customizing PICmicro Microcontrollers by Myke Predko, and a PIC programmer/tester kit (KD6064 -16F/C84 PIC Programmer Kit from Jaycar). The kit included a 16F84. I was pretty excited when I got my first LEDs flashing, but didn't quite grasp the possibilities of what could be done with them. Then I started to read Myke Predko's book. All the assembly, and CPU architecture stuff was a bit boring, but I really got excited when I skipped ahead and checked out the projects. I was happy that the electronic circuits were there too, me being a bit of an electronics hack, can do with plenty of help.
The more I played with the controller, the more I got excited about starting my first project. I planned to build a standalone version of TrackTimer, the lap counter for my mini-z. It will be called TrackTimerEx, Ex for external.
The real problem for my first project was the number of I/O lines that I needed to implement the project. None of the PIC microcontrollers available locally had enough I/O ports. So I decided to have a look at the AVRs. I was wrapped to see the AT90S8515 and AT90S8535 available locally. These controllers are 40 pin ICs with about 30 I/O pins. I also discovered that the AVRs have assembly instructions to support a stack. As I was planning to write code in assembler (yeah, I'm a masochist) the stack instructions were invaluable. I got the datasheets from the Atmel website, I got a programmer for the AVR (the PICALL from Dontronics). I also invested in Programming and Customizing the AVR Microcontroller by Dhananjay V. Gadre. Again the CPU architecture was a bit long, and the sample circuits were well appreciated. Being a professional developer, I found both books' treatment of software development a bit simple.
So that was it, all set for my first μC project.
Programming Problems
The PICALL programmer supported using the ISP - In-circuit System Programmer. This was something that I couldn't get working properly, so I was forced to pull the μC out of the circuit, put it in the programmer, program it, then return it to the circuit. I put the μC in a machine pin IC socket to protect it, but this became really tiresome. So I decided to look around for another solution.
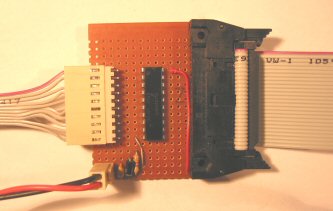
Atmel produce and sell programmers/starter kits, but they all looked a bit expensive. I found a site on the web for a programmer called AVReAl - printer port AVR serial programmer. Not only is there software available but there is also sample programmer circuits. I built the Atmel STK200/300 adapter. Here's a picture of it here, cobbled together on a bread board, solder with wirewrap wire underneath. See the TrackTimerEx project for real spaghetti wiring.
|
|
|
|
| Board Top - The IDC connector is all I had lying around. On the other end of the ribbon cable is an IDC 25 pin connector | Board Bottom - Icky spaghetti wiring, but it works. Note the extra diode tacked onto the bottom. This was put on to prevent something flowing back into the programmer. |

The breadboarding is ugly and I want to redo it one day. It should all fit into a 25 pin backshell.